
Remove the screws and open the cover.
Make sure to use the proper size and type of screwdriver. (Phillips head #1 screwdriver is recommended.)
Insert the included battery.
Do not remove the battery from its tube casing.
For TR41 and TR42: A rubber packing is provided inside the cover. Check the rubber packing for any cuts or scratches and close the cover as it was when opened.
Dust or defects on the packing can adversely affect the waterproof capacity; in this case, remove the dust or replace the packing if it is damaged.
| Model | Battery Life | Conditions | |
|---|---|---|---|
| Rec Interval | Graph Display | ||
| TR41/42 | About 1 month | 1 sec | constantly |
| About 1 year | 1 sec | less than 3 min a day | |
| About 1 year | 10 sec or more | less than 1 hour a day | |
| About 1.5 years | 10 sec or more | less than 3 min a day | |
| TR45 | About 1 month | 1 sec | constantly |
| About 6 months | 1 sec | less than 3 min a day | |
| About 6 months | 10 sec or more | less than 1 hour a day | |
| About 1 year | 10 sec or more | less than 3 min a day | |
The battery warning mark may appear sooner than noted above.
Battery life will be shortened when: downloading data very often, setting the recording interval at less than 10 seconds, or measuring in an environment below 0°C or above 60°C.
Connect the supplied sensor to the sensor jack.
Insert the sensor completely until you hear a “click” sound.
Upon recognizing a sensor, the LCD will display the measurement.
Loosen the screws of the terminal block.
Insert terminals A and B according to the diagram shown on the terminal block.
Firmly tighten the screws to the terminal block.
(Maximum torque: 30N・cm)
In the case of a 4-wire sensor, one wire will be left unused.
Use the supplied cable clamp to protect wire.
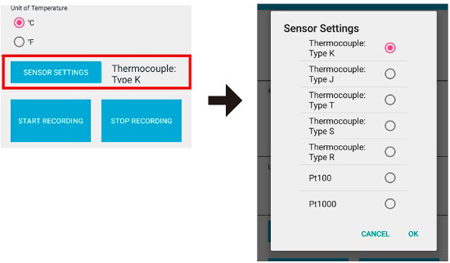
Make Sensor Settings in the App.
Check the sensor type and the polarity (plus and minus signs).
Loosen the screws of the terminal block.
Insert terminals plus and minus according to the diagram shown on the terminal block.
Firmly tighten the screws to the terminal block.
(Maximum torque: 30N・cm)
Use the supplied cable clamp to protect wire.
Make Sensor Settings in the App.
Make sensor settings when connecting the sensor to the TR45 for the first time or when changing the sensor type.
In the Top screen of the ThermoREC App, tap ![]() for the target TR45 and select “Make Settings”.
for the target TR45 and select “Make Settings”. 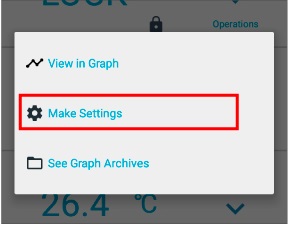
Tap on the Recording Settings cell.
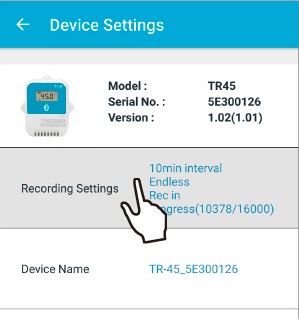
Tap Sensor Settings, and select the sensor type.
 |
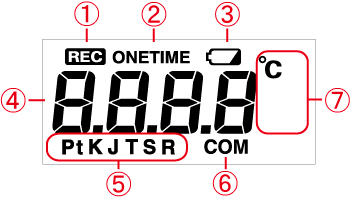
[REC] Mark | Shows the recording status. ON: Recording in progress BLINKING: Waiting for programmed start OFF: Recording stopped |
|---|---|---|
 |
[ONETIME] Mark | Indicates the recording mode is set to "One Time". The factory default setting is "Endless" and this mark does not appear. Endless: Overwrite oldest data when capacity is full. One Time : Recording automatically stops when capacity is full. |
 |
Battery Warning Mark | Indicates it is time for the battery to be replaced. Please change the batteries as soon as you see this mark. See: Installing the Battery When the battery level becomes low, Bluetooth communication may not work properly. If the battery is left unchanged, all recorded data in the logger will be lost. |
 |
Measurement / Indications | Measurements or operational indications are shown here. |
 |
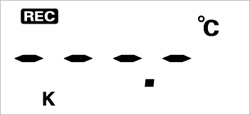
Sensor Type (TR45 only) |
Shows the type of sensor set in the application. Thermocouple Sensor: K, J, T, S, or R Platinum Thermal Resistance Sensor: Pt (Pt100) or PtK (Pt1000) The sensor type can be changed via the application. |
 |
[COM] Mark | Blinking: Communication in progress |
 |
Measurement Unit | °C or °F |
Logging Capacity FULL |
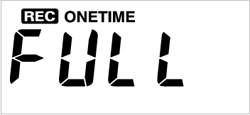 |
When Recording Mode has been set to “One Time” and the unit reaches its logging capacity of 16,000 readings, recording will automatically stop and in the LCD the measurement and the [FULL] sign will alternately appear. |
|---|
Estimation of time until [FULL] is displayed
| Rec Interval | 1 sec | 30 sec | 1 min | 10 min | 60 min |
|---|---|---|---|---|---|
| Time Period | About 4 hours | About 5 days | About 11 days | About 111 days | About 1 year and 10 months |
Sensor Error |
|
|---|---|
 |
This will appear when a sensor has not been connected or the wire has been broken. |
| Note: Recording is in progress and so is battery consumption. If nothing appears on display after reconnecting the sensor to the unit, there is a possibility that the sensor or the unit has been damaged. | |