Making Clock Settings
Open [Clock Settings] from the [Settings] menu.
A different settings window will appear depending on the connected device.
Note
- When there are multiple device icons in the Connected Devices box, select the one for which you wish to make settings.
- When using auto upload to the server, the Clock Settings window can also be opened from the [Auto-upload Settings] tab.
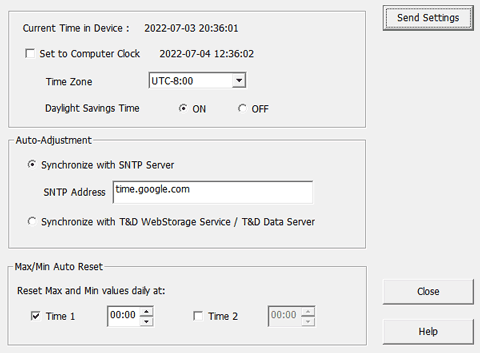
TR7A Clock Settings
If you intend to download recorded data via USB, please carry out clock settings before you start a recording session.
Note
Recording can be performed without configuring the device clock, but it has the following effects:
- The Max/Min Auto Reset does not work properly.
- The date and time of the operation logs are not displayed correctly.
- If power is lost during recording (such as battery shortage), the first reading of the collected data will be displayed as 2000/12/31 or 2001/1/1 (the time will vary depending on your location).

| [Send Settings] Button | This will send the settings to the connected device. |
| Current Time in Device | Displays the time of the internal clock of the connected device. |
| Set to Computer Clock/ Time Zone/Daylight Savings Time |
Check the box when using the USB connection to download the recorded data.
Default Setting: UTC+1:00 for Serial Number "No.4XXXXXXX", Daylight Savings Time ON UTC-8:00 for Serial Number "No.3XXXXXXX", Daylight Savings Time ON
|
| Auto-Adjustment | Check the box when using auto upload, and select either "Synchronize with SNTP Server" or "Synchronize with T&D WebStorage Service".
|
| Max/Min Auto Reset | If necessary, change the auto-reset setting, reset time and frequency.
|
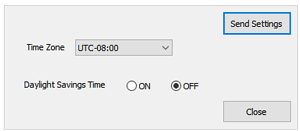
TR-7wb/nw/wf Clock Settings

Note
The TR-7wb/nw/wf loggers get timing information for measurements etc from the computer’s clock when connected via USB and recording is started or data is downloaded. If the times of the measurements are not displayed correctly, check your computer’s clock and make sure it is accurate.
When automatically sending recorded data to the cloud, the time is automatically synchronized with the server at the time of the first successful communication and every 24 hours thereafter.
| [Send Settings] Button | This will send the settings to the connected device. |
|---|---|
| Time Zone | Specify the region where the device will be used. |
| Daylight Savings Time | Select the time zone for the measurement location, and switch on or off the daylight savings time Default Setting: UTC+1:00 for Serial Number "No.4XXXXXXX", Daylight Savings Time ON UTC-8:00 for Serial Number "No.3XXXXXXX", Daylight Savings Time ON
|