Making Auto-Upload Settings
Make network settings to automatically upload recorded data to a server via Wireless LAN or Wired LAN.
- [Auto-Upload Settings] Tab
- Network Settings (for Wired LAN Type)
- Network Settings (for Wireless LAN Type)
- Usage Example for Multiple Wireless LAN Connections
IMPORTANT
Uploading data to the cloud server (T&D WebStorage Service):
- The device needs an Internet connection.
- When the storage period in T&D WebStorage Service is exceeded, old data will be deleted. Refer to "T&D WebStorage Service Details" for more information.
https://webstorage-service.com/info/ - You can set up to send a warning notification from T&D WebStorage Service to up to 4 email addresses. (See Warning Mail Settings)
Uploading data to another server:
- Use T&D Data Server or your own web server as the destination.
- You can set up to send a warning notification from T&D Data Server to up to 8 email addresses. (See T&D Data Server Help)
[Auto-Upload Settings] Tab
The items displayed in the Auto-upload Settings window differ depending on the type of connected device.
Note
- When there are multiple device icons in the Connected Devices box, select the one for which you wish to make settings.
- Auto-upload settings can also be made using the buttons on the device. Refer to the user's manual for the setting procedure.
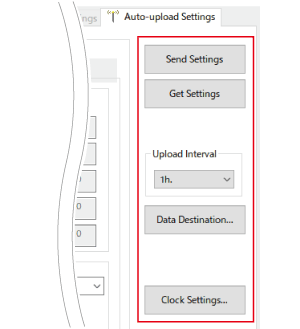
| [Send Settings] Button | Click this to send the settings to the connected device. |
|---|---|
| [Get Settings] Button | Click this to retrieve the settings from the connected device and display them. This can be used to apply the same settings to multiple devices as shown below:
|
| Upload Interval | Select the interval to upload the recorded data: OFF, 1, 2, 5, 10, 15, 20, 30min. 1, 2, 3, 4, 6, 12, 24hrs
|
| [Data Destination] Button | Select the destination for uploading the recorded data. It is recommended that you select T&D's cloud service if you have an internet connection. (See "Data Destination" below) |
| [Clock Settings] Button | A different settings window will appear depending on the connected device. TR7A Clock Settings TR-7wb/nw/wf Clock Settings |
Data Destination
Place a check next to the desired destination server.
| [Send Settings] Button | This will send the settings to the connected device. | |
|---|---|---|
| Select the destination server: | T&D WebStorage Service | Cloud Service with English display. |
| Ondotori Web Storage | Cloud Service with Japanese display. | |
| Specified Address | "T&D Data Server" or your own web server.
|
|
| Root Certificate | In order to send data to the specified address via HTTPS, you need a root certificate installed on your device.
|
|
Network Settings (for Wired LAN Type)
Enter the necessary information and click the [Send Settings] button.
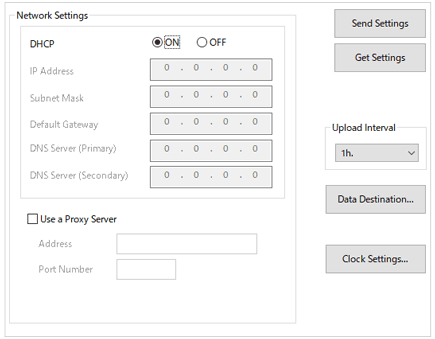
| DHCP Settings | Select ON to use DHCP. When not using DHCP, select OFF and then enter necessary information such the IP address. |
|---|---|
| Proxy Server Settings | If applicable, check the box [Use a proxy server], then enter the address and port number in the respective fields. A proxy server that requires authentication cannot be used. |
Network Settings (for Wireless LAN Type)
Enter the necessary information and click the [Send Settings] button.
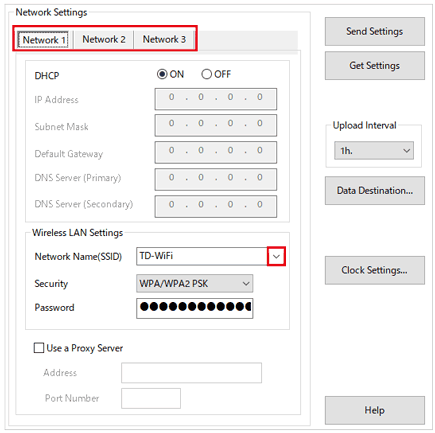
| Network 1-3 | Settings can be made in each tab for a total of up to three wireless LAN connections. Entry of the Network Name (SSID) is required. (See: Usage Example for Multiple Wireless LAN Connections) |
|---|---|
| DHCP Settings | Select ON to use DHCP. When not using DHCP, select OFF and then enter necessary information such the IP address. |
| Wireless LAN Settings | Enter necessary information about wireless LAN connections (Network Name, Security and Password). For the TR7A, you can click on the drop-down arrow and get a list of nearby access points. Accepted Length Network Name (SSID): Up to 32 characters Password WEP: 5 or 13 characters / 10 or 26 digit hexadecimal value WPA/WPA2-PSK(AES/TKIP): 8 to 63 characters / 64 digit hexadecimal value Accepted Characters 0-9 a-z A-Z space ! # $ % & ' ( ) * + , - . / : ; < = > ? @ [ \ ] ^ _ ` { | } ~
|
| Proxy Server Settings | If applicable, check the box [Use a proxy server], then enter the address and port number in the respective fields. A proxy server that requires authentication cannot be used. (For TR-71wf/72wf(-H), this will apply firmware version 1.05 or higher.) |
Usage Example for Multiple Wireless LAN Connections
For WLAN type, it is possible to make settings for up to three network connections, which is convenient in cases when measuring in movement from various locations, as in the figure below.
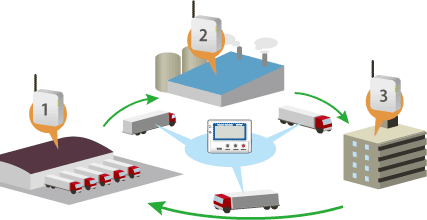
The following steps are taken at each auto-upload interval.
- Attempt to connect to Network 1. Send data if connection is successful, without attempting to connect to Network 2 and 3.
- If unable to connect to Network 1, try Network 2. Send data if connection is successful, without attempting to connect to Network 3.
- If unable to connect to Network 2, try Network 3. Send data if connection is successful, and if not, data will not be uploaded and the upload will be treated as a transmission failure.
IMPORTANT
Unsent recorded data will be gathered and sent together at the next scheduled transmission. However, if the logging capacity is exceeded in Endless mode, overwritten old data cannot be sent. This means data stored on the T&D WebStorage Service or T&D Data Server has a missing data.